Tuesday 2 December 2014

Sails & Trailer

Some good progress to report since my last post.  I installed the centre board having applied several primer coats to the inside of the centre board case and 2 coats of antifoul.  Some smaller jobs were finished such as installing the traveller on the transom.  Next up was to make new mast tangs for the shrouds.

Then a call came for the sailmaker, Yannick Lemmonier,  to say that my sails were ready and he could come to fit them, to make sure they fitted correctly.

Yannick had already sent me a sail design viewer with his designs for my boat, which were very interesting:-


And here they are in real life:-


Here is the jib with Yanick Lemmonier from West Sails in the background.  Yannick took great care in every detail to make a beautiful suit of sails.  I was curious to see the batten in the jib and apparently a small roach cut in as well.

Here you can see the mail sail being hoisted - a very satisfying moment!


Spurned on by this progress, I set about enlisting my friend Brendan to help build a trailer.  We had looked at a number of commercial designs but all need some modification and our local galvanizing company will not galvanize any metal which has already been galvanized, so if modifications were made they would leave the structure susceptible to rusting.  So nothing for it but to order up the steel and trailer components.  We used some of the original molds to allow us accurately site the hull supports.  Having the boat plans to hand was very useful in deciding dimensions.


Here are some photos of the trailer nearly completed - just needs to be fitted to the boat to make sure it works and then off to get galvanized.


We designed the trailer with an extendable tongue which consists of 60mm box section sitting inside a 70mm section, and secured in place by two removable pins.   The bunks are adjustable and the rear bunks are designed to be removable so that they are clipped off before launch and retrieve.

In this next photo you can see where the extension tongue is held inside the larger box section for on the road towing and when these pins are removed you can extend the tongue to various lengths to suit the launch ramp - hopefully this will allow us launch without launching the tow car as well!


Tow coupling hitch is bolted to the inner box section which is nested within the main centre channel of the trailer


Adjustable and removable rear bunks with magnetic real lights

Adjustable mast support and winch assembly for bow of boat.


Sunday 19 October 2014

Milestone Event


I took advantage of the fine weather yesterday to work outside and paint the final coat of antifoul and topside paints.  Using a roll and tip method went very quickly, thanks to assistance from Siobhan,  and I noticed that the paint dried much quicker than previously when working inside my small garage.

I had a call from my sail maker to say he could be here tomorrow to measure the mast bend before making the sails!  So that spurned me on to  attach the shroud plate and forestay tang in order to step the mast.  Brian came along to help but then I noticed that I had made two forestay tangs and a jib halyard tang in bronze but missed out on the mast shrouds.... So I had to jury rig up two shroud plates out of some galvanized door hinges which were remarkably suited to the task - even if they are only temporary.

First we clamped the shroud plates and tang to the specified positions on the mast to make sure that the shrouds and forestay were the correct lengths, as the bronze bottle screws are quite small and don't allow for much adjustment.

This proved a good idea, as it allowed us to drill and screw the plates at exactly the right height.  I noticed that the mast is turned slightly in the mast step, so I have slight adjustments to make in the tenon at the bottom of the mast, but nonetheless, it was a great feeling to finally step the mast and stand back and look at the boat in her nearly completed state.

You can see where the foredeck meets the coaming that the paint line is irregular - despite a number of attempts.  I'm think I may need to apply a rounded epoxy bead to ensure a cleaner fit - unless others have suggestions.

Quality Control Officer....

Tuesday 30 September 2014

Fitting out

I managed a further coat of varnish and also a final coat of interior hull paint.  In my last post I mentioned having used 2.5 liters of varnish so far.  I might have be wrong!  (it's been known.....)  As when I went looking for the second 2.5 liter can of varnish it was nowhere to be found...and now I have a sneaky feeling that I might have used that too.  5 liters of varnish for two seats, spars, transom and coamings (is that possible??) or else I have hidden the second can somewhere safe...where it can't be found!  No matter, I have had enough of varnishing for the time being and I am inclined to leave the existing coats harden up for a while, maybe months, before the final coat - if there ever is such thing as a final varnish coat!

My metal polishing kit arrived and so that provided an interesting interlude to paint and varnish.  I set up my polishing station and set to work on the bronze plate and some of the bronze parts.

Home made mast components, polished and ready for assembly.

I the set about fitting various bronze parts which I have been accumulating over the past while.  It's quite a pleasant task finally sorting out and fixing these to the hull - certainly feels like you are on the home straight.

Here you can see the pad eye being installed on the boom.  JB calls for long screws and so I chose 1 1/4" #10's and the solid boom provided a secure attachment.   Other parts were more awkward to fit which called for more drastic measures:- my €7 90deg drill attachment from Lidl finally shone!

I needed to drill pilot holes under the side decks to fit the jam cleats for the jib sheets, which are located just over the side lockers.  I sited these cleats on backing pads as they seemed to be a bit lost otherwise.

The plans describe options to lead the jib sheets over the coaming, but suggest that they may wear the edge of the coaming - seems very likely  - or you can alternatively drill obtuse holes in the coaming to allow the sheets run more directly to their cleats.

The jib is self tending and the jib sheets run through blocks attached to the foredeck.  So after a false start (drilling holes and missing the supporting  deck stringer), I installing two strap eyes, onto which are attached small jib sheet block with small bronze shackles.

Here you can see the mast partner and halyard cleats attached to the forward deck beam.  They took large 3" #14 screws mounted on backing plates to ensure the halyards clear the nosing on the deck.   Also in this picture you can see the brass angle stock which needs to be drilled and threads tapped secure the side seats.


Once I had the locker doors installed, I noticed that subsequent fitting of the sole boards became impossible as the boards were catching on the lower ledge of the aft locker trim.  So I took the temporary option of removing the door, fitting the sole boards and refitting the door.  Not sure that is the ideal solution, but I am reluctant to cut them short to allow for easy removal.  That being said, it's not a huge job to remove 4 screws and take out the rear door assembly.
Seats and sole boards installed

You can see where the lower sill on the rear locker assembly reduces the space to install the soleboards.

My next task was to install the traveler on the transom.  The plans call for a 3/8" bronze rod of x lenght (can't recall dimensions off hand) and then screwed into the bronze base fittings.  However the fittings I have seem different to those JohnB used on Red Sky which results in a longer assembly.  So I am wondering if there is any merit in having a longer traveler bar.  And while on the topic, I am not at all sure of the merits of a traveler system without a mechanism to control the main sheet position.

Here's a photo which shows roughly where the traveler will sit on the transom:-
Traveler sitting approximately in its final position 
The picture also shows up the orange peel and runs of my varnish work but I am stupidly optimistic that my next coat of varnish will absolve all!

Next I need to redraw the DWL on the hull and do a final exterior hull paint coat and antifoul paint.


Wednesday 24 September 2014

Two Steps forward One back.....

I have applied a full 2.5 liters of marine tung varnish (Hempels Classic Marine Varnish) but I have no idea of how many coats this represents!  Some coats went on fine others ran or ended up like orange peel.  I have been varnishing the mast out doors but the bugs seems to like this brand of varnish and they make kamikaze missions within minutes of applying the varnish.  Some have the decency just to lightly touchdown and glue their tiny legs to the mast (which flick off without leaving much damage when dry), others roll around and splash their wings in the goo, which consequently I have had to sand off some coats, scrape off others and so the "Two steps forward One back",,,,,

I have applied three coats of paint to the inside of the hull which turned out very well - producing a nice uniform hard wear resistant enamel finish.  I also installed the locker doors which are also varnished and compliment the cream paintwork quite well.


To maintain some sanity, I turned my attention to fabricating the mast hardware from bronze plate.  I sourced 3mm bronze plate from a Dublin supplier, James Healy Founders, who were very helpful.  I also sourced brass angle which were specified for attaching the side seats to the bulkheads.  Next I sourced a metal cutting bandsaw blade from Tuffsaws in Wales.  Ian is very responsive and generous with his information and advice.  So yesterday, my new blades arrived and I reset the drives on my band saw to the slow speed, installed my new 1/4" 14TPI blade.


I was very impressed on how well I was able to cut the bronze plate and soon had fashioned the various tangs and parts for my spars.   I photocopied the various FSP from JB's plans and cut them out and glued them to the bronze plate, which gave me an accurate cutting pattern.  Drilling the holes in the bronze plate was straightforward despite advice which I had read to the contrary.

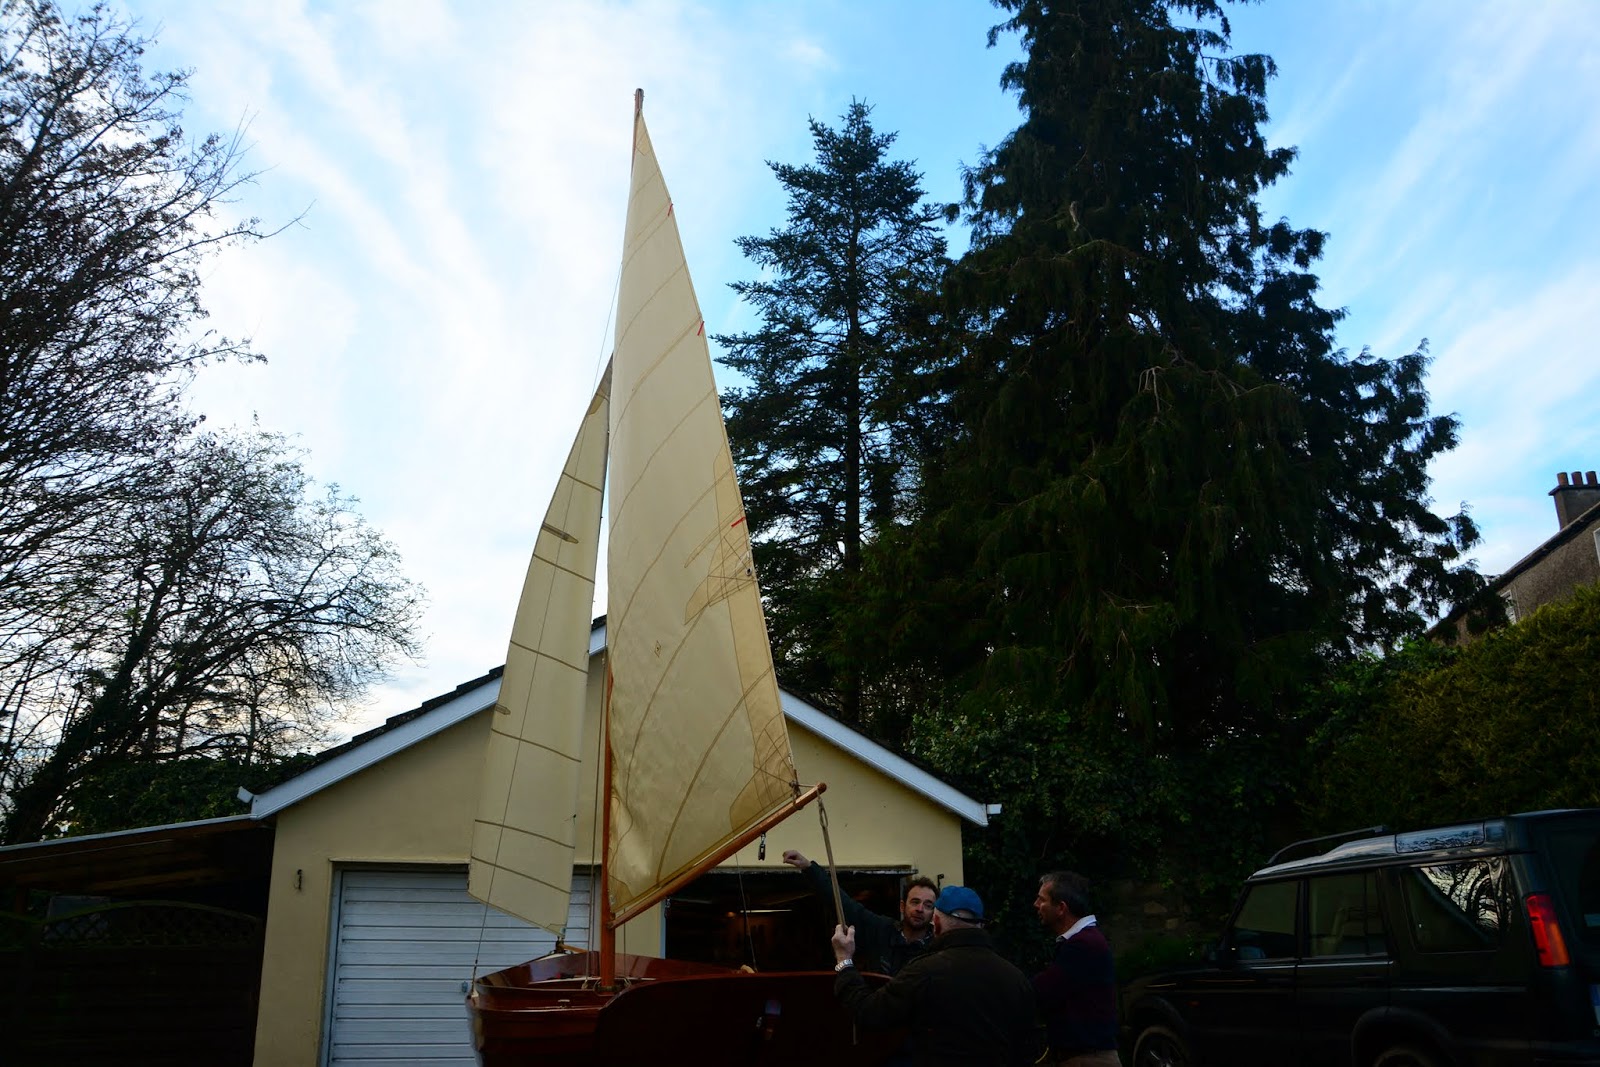
Next I installed the sail track onto the mast and boom.  I elected to use bronze sail track with matching bronze sliders, sourced from Classic Marine.  They had to supply in 6' lengths and I was wary of how well they would align and ensure smooth travel of the sliders - but I needn't have worried as they butted up perfectly and made for a virtually seamless join.

I also painted the dynel decks with the same Hempel Multicoat paint, which I have found to be very successful.  It's a marine enamel and dries faultlessly (unlike their varnish) and gives a nice smooth and hard finish.

Also managed to source a 3/8" UNF tap to cut my bronze traveler rod which screws into the transom bronze mounts.  So it seems that the boxes of bronze bits are finally being assembled onto the boat and I am making satisfactory progress.

Having trial fitted the side seats, it did seem that they looked a little thin, so I decided to add a nosing as JB mentions in his plans.  However in a moment of absent mindedness, I managed to epoxy the nosing onto the back rather than front of the seat!  So nothing for it but to cut off the lower edge and pretend that it was intentional to match the nosing which I had to make again for the front of the seat!  So now I have edging on the front and back of the seats, in mahogany which compliments the Sapele seats quite well.
The seats now are closer to 15" wide, so time will tell if that makes for a good ergonomic solution, if not I can always remove the nosing at the back of the seats.  Next I installed the cleats to support the seat ends on the bulkheads.  They need a final lick of paint before I install the angle brass.

Before I can fit the bronze plate components to the mast, I need to polish them to an acceptable finish - so this time I found yet another helpful company based in the UK who specialise in metal polishing equipment, called Metal Polishing Supplies UK Ltd.   Simon advised my that my 450 watt bench grinder could easily be converted to run their 6" mops, so by the end of this week, I expect to take delivery of their conversion kit and finish polishing these parts for final assembly.

The masthead strap was also fabricated from 3mm bronze with a 3/8" bronze rod running through the mast and the plate each side to support the masthead sheave.  It's quite tricky making sure that the holes line up perfectly perpendicular to the mast track as it is nearly impossible to bring the mast to my pillar drill single handed, so I relied upon a hand drill instead.  I got an acceptable result with some minor fiddling....

I need to tackle fitting the mast shroud tangs to the mast, but I am wary of just screwing them on as per the plans as the turnbuckles have only about 1" maybe 1.5" of adjustment.  So I am wondering how best to measure the the exact placement.  I'm think I will attach the shrouds to the chain plates and then to tangs to the other ends and tape them securely to the mast before a trial stepping.  

Maybe others can comment if there is a more elegant solution.


Friday 22 August 2014

Varnishing & Primer Coats

Pushing ahead these last few days and managed to get two coats of primer on the inside of the hull.


Each day, I have been varnishing my mast and yesterday I poured some Hempel's Wood Impreg inside the mast, which will hopefully add further protection.

I called to my local bronze plate suppliers today and they are going to cut out the plate for my mast fittings.  Once I have these fitted, I can step my mast and call my sail maker to measure up my sails.

My seats turned out quite nice, book matched.  But the process of reattaching the cutoff to the rear of the seat shows up in the grain pattern.  So far I have just put sealing coats, but I will start the varnish coats over the next few days.


I finished the edges of the seats by hand, which I have come to prefer over using my router, as it seems to give a more natural finish.
Smoothing out the inside curve with my spokeshave


Wednesday 20 August 2014

Summer update

Yours truly on Embla
Hopes to launch this summer came to an end when a shop restoration project took me away from my boat building, then summer holidays intervened...no complaints as cruising the Ionian in Greece is not hard sailing by any standards!

On my return, I decided to get stuck in and made a conscious effort not to procrastinate as to what way to make parts, but to get things done!  I've found that I seem to spend more time thinking about what way to approach a task rather than just moving ahead.  The result has been encouraging....progress at last!

I began with finishing the mast and spars as I wanted to get these varnished while the weather was reasonably clement.  July was a very hot month in Ireland - when I was sailing in Greece, but when I came home, the weather turned quite wet, which didn't really help
Mast hanging to dry
matters, but at least the temperatures were suitable for varnishing and painting.  I had to reduce the diameter of the mast from the foot to the mast partner in order for the MP to fit - I had built a birdsmouth mast which was 20% larger in diameter than
Orange peel on centre board trunk cap
original spec.  Once completed, I applied several coast of varnish.  I'm using Hempels Classic Varnish which I find tricky to use - it needs to be applied in very thin coats, anything heavier results in orange peel on flat surfaces and drips and runs elsewhere.

I had to redo some bright work as the varnish never did seem to cure properly.  So I had to scrape off the varnish and start again - this time I was especially careful to apply the varnish very thinly and it seemed to dry satisfactorily overnight.


Next I scarfed some Sapele to make the rub rails.  Once again my trusty Farriers
Farriers File on scarf joint for rail
File makes short work of the hardened epoxy excess from the joint which saves blunting planes and scrapers.  The plans call for a variety of angled cuts on the table saw, but my table saw tilts in the wrong direction, so I couldn't make this work.  I then resorted to the router table with a selection of bull nozed cutters.  The rails need to be tapered at both ends in two dimensions so the final trimming was done by hand.  The result was reasonably elegant.

Attaching the rails was quite easy although the thin ends which were tapered were tricky to counterbore and plug.


Side rails being molded

Sole boards with spacers in
between to even out planking
Next up was the sole boards.  I had bought lengths of  US Red
Wood as per John's plans.  I resawed and ripped these into plank lengths and then went about fitting them to the floors.  I made the soles in two halves either side of the centreboard trunk.  It was more tedious than I had originally envisaged.  I then finished them with Hempels Wood Impreg, which seems lighter than a wood oil and seems to penetrate the timbers.   Job done...

The mast step was next up.  Not having sailed small boats like these before, I had no real picture in my mind as to how this was to be fabricated and the plans did not enlighten me.  A fellow SS builder, JohnC kindly send me a photo some
time ago, which I was able to reference and construct the mast step out of Sapele. I had read on the Yahoo Glued Alpstrake forum that some builders were planing on having the step rest on the keelson, but I elected to stay with the plans and have it sit for and aft on its designated cleats, which you can see ffrom the photo opposite.   It is quite a solid beefy part, which is reassuring.

Then the dreaded sanding..... I had been sanding intermittently on the inside hull but as additional parts were added more epoxy spilled here and there, and even when wiped off, it still seems to leave an uneven surface.  So out with my Bosch Multi Tool and I spend a good solid day sanding the inside hull.  Next I applied a coat of Hempel aluminium primer which showed up a few minor imperfections and so began the tedious iterative process of epoxy filler,sanding, priming again, filling, sanding etc.. you get the picture.  It is difficult to know when enough is enough....I guess when the finish coats are applied, I'll know the answer to that conundrum.

Yesterday, I began working on the seats.  My boat has been in my garage for nearly 3 years in the making and I had three large 16ft long x 2" thick x 14" wide
sitting under covers underneath the building jig and cradle.  So the time had come to take her out of the garage into the sunlight.  Four expensive caster wheels later and my son Harry, my good lady Siobhan and I were pushing the boat out of the garage sitting in its now mobile cradle.  It's a heavy boat make no mistake!


Just as I was about to take some photos, the rain came down - so this is as much as you can see of her now!!  But I was pleased that the planking lines looked good to my eye, which was a relief as up to now I had about 18" of a vantage point looking at her bow!  Such are the joys of building in a tight working space.

The clear garage space allowed me to tidy up and get working on the seats.  Since I had opted for the lockers, my seats would need to be 14" wide necessitating in cutting a curve in the straight 14" board and gluing the inner curve to the back of the outer curve.  I made this cut first as my thicknesser will only handle 12".   It also meant that the band saw would have a slightly easier time resawing the boards.
As it transpired the band saw protested and squealed its way through the board with quite a lot of drift, so I had to thickness the resulting boards down from 1" (25mm) to  more like 19mm.   However, I think the result is
actually quite fine as 1" seats would have been very heavy - as it is they are quite heavy at 19mm.  Maybe at some later stage I might router out faux planks in the seat either side of the lockers to save weight and allow water to flow away more easily.

Here's a shot of making the two parts mate to each other using John Brooks advice to flush trim each edge against a common straight edge.  On such a long run, I found that I had the odd splinter however, I think the result will be fine.  It's gluing up tonight so tomorrow will tell the tale when I get to finishing off the seats.

You can just see a glimpse of  caster wheels on the cradle in this photo.

I'm happy now that I am well on the way to completing this boat.  I need to source some more bronze plate to finish off the mast hardware.  Finish painting, screw on the bronze hardware, organize a trailer and buy some sails....Can't see a 2014 launch...can you??